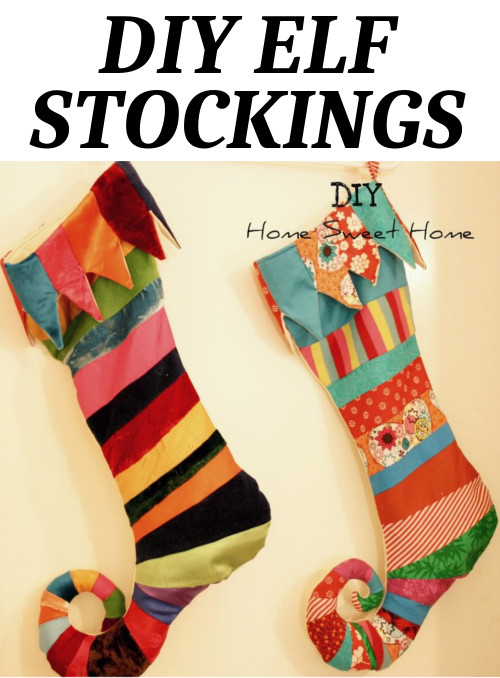

Ok, so I may be a little biased but I think that these have got to be the cutest stockings ever.
You want to know my favorite part about these stockings??
They are made from dresses that once belonged to my Great Grandma!!
A little over a year ago Grandma gave me a HUGE bag full of dresses and fabric scraps.
Wait!! Do you want to see more amazing DIY projects?!! Subscribe to my mailing list to get updates sent straight to your inbox!
This post may contain affiliate links. Click here to read my full disclosure!
The story from Grandma is that once it became acceptable for women to wear pants, Great Grandma wanted nothing more to do with dresses at all. She gathered up all of her dresses and skirts and gave them to her daughter (Grandma) and wore nothing but pants from then on.
My Grandma had plans of one day making a quilt out of them but never got around to it. They have been sitting in storage all this time. That was until a little over a year ago when Grandma passed them on to me to create something wonderful.
Is that not the coolest story ever?!! I love family history.
Now my girls have a part of their Great Great Grandma that they can pass down to their children one day.
Want to make one of your own?
*Warning: This is a very long post. I made several mistakes with my first stocking so I added lots of detail to make sure you don’t make the same mistakes.
I googled elf stockings and found a few adorable ‘FREE’ pattern.
However, I wanted something a little larger (although I’m sure there is a way to enlarge a pattern on the computer before printing it. But I have no idea how to do that) so I ended up making my own.
Using a large piece of brown paper (I recycled a paper grocery bag) draw something that resembles an elf stocking. I used a plate to help me draw the rounded heal and toe. Once you have something you are happy with, cut out your pattern.

Decide what fabric you want to use then cut a few strips 1 1/2 – 3 inches wide. The length of your strips will depend upon the width of your stocking. You want your strips to extend about a half inch on either side of your pattern. Sew together just enough strips to cover the straight part of the stocking.

This next part is a little tricky. If anyone knows an easier way I would love to here it.
I wanted my fabric to curve with the heal and toe so I cut the rest of the fabric as I went. Laying your fabric down on top of the pattern, decide the size and shape for the next piece of fabric. Cut. Sew. Then repeat. I did this for the rest of the front piece. Sewing each piece on before cutting the next piece.


Once all your pieces are sewn together. Iron your fabric. (Just in case you didn’t know, ironing really old, delicate fabric, is a pretty scary thing. I had the iron on the lowest setting and slowly adjusted it. I was so afraid I was going to ruin it!) Now, lay your pattern down on top of your fabric and trace along the entire pattern.
The back was a lot simpler. Decide what fabric you want for the back. Cut your fabric slightly larger than your pattern. Lay your front and back pieces together. Make sure the right sides are facing each other. Then sew along your entire pattern.

Make sure you add a few extra stitches to the toe so that it does not come undone when you turn it inside out and iron. Next you can trim around your stocking, cutting away any excess fabric.
Onto the lining. Trace your pattern onto your fabric but stop before you get to the toe part. Here is a photo to show you what I mean.

I know you can barely see my drawing but I hope you get the point. You don’t want candy and toys getting lost in the toe. Cut two pieces of lining, sew wrong sides together.


Once I had this complete I placed the lining into the stocking placed it over the edge of counter to admire my progress. The toe flopped over instead of curling up like I had envisioned. I took the lining out stuffed the toe with some cotton filling I had, then replaced the lining.

Much Better!
Now onto the cuff. Measure the top of your stocking, double it, then add an inch for seam allowance. Cut a strip of fabric this length and about 7 inches wide. (7 inches worked for my pattern. Use a width that you think will work for yours.) Now cut and sew a bunch of 7 inch strips of fabric together until you get a length equal to your previous piece.

For example. My stocking measured 9 1/4 inches. Double that to 18 1/2 then add an inch to 19 1/2. I decide to make mine easy and rounded up to 20. This meant I could use 10, 2 inch (2 and a half after adding seam allowance) strips to equal 20 inches. If you are slightly off on the measurements it doesn’t matter since the seams will be coming together on the back of the stocking so no one will see it anyways.
To make the points, draw two straight lines across the length of the fabric then connect them with a zig-zag pattern, placing the bottom points in the center of each strip and the top points along the seams of the strips.

Be sure to stop about a 1/4 inch from the ends to allow for seam allowance.

Sew along your zig-zag pattern (double stitching around the corners). Trim off your excess fabric and turn inside out. Iron.

Now fold in half, right sides together, and sew to desired length (when folded it should be equal to the width of the top of your stocking.)
Place the about 1 half inch of the raw edge of your cuff inside your stocking between the outer layer and liner. Make sure that your seam is in the back. Pin in place.
Cut a piece of ribbon and fold in half (this will be used to hang your stocking).
Place ribbon between your cuff and liner at the seam of the liner.
Sorry, due to technical difficulties a few photos got deleted from my camera
. Hope these help.

Cuff tucked into stocking.

Ribbon sewn between cuff and liner.
Sew around entire cuff, double stitching over the ribbon.
Flip your cuff over and your done!
Related posts you may enjoy:
- Simple Diy Ideas for the Holiday
- 25 DIY Christmas Ornaments
- Fun Christmas Crafts for Kids
- Adorable, Recycled Christmas Ornaments
- 19 Mind Blowing Christmas Hacks
- 6 Creative Christmas Sweater Ideas
- 15 Rustic Farmhouse Christmas Decorations
- 8 Dollar Store Christmas Crafts
Connect with me & stay up to date with new posts on DIYHSH
Facebook | Twitter | Pinterest | Google+ | Instagram
Wait!! Do you want to see more amazing DIY projects?!! Subscribe to my mailing list to get updates sent straight to your inbox!

LOVE IT!! These are so beautiful and the back story of your Great Grandma is adorable 🙂 I'm not very good at sewing, but I am definitely going to try this!
The stockings look so fun and cute! I hope you will come share this at my d.i.y Christmas decor link party 12/7
These are ADORABLE and extra-special because of the fabric you used. Terrific!
you're right those are the cutest ever. I did some simple elf stockings but these blow those out of the water! thanks for linking up these are awesome
These are unique and adorable! Love them!
They look amazing, and what a great way to store family memories.
This is great!!! I've been looking for a good stocking pattern to make. Gonna have to give it an "April" try:) Your newest follower!
They are the cuteset stockings ever, FOR SURE!!! And that they are made from your grandma's dresses, melts my heart!!! Impressed as ALWAYS!
Aimee @ ItsOverflowing.com
Those stockings are adorable – from the fabric (and your story about loving pants), it looks like your great grandma may have been a little sassy with her fashion choices :). Great story to pass along with the stockings…maybe you could put the date inside the lining or something so future generations know how special they are.
Thanks for stopping by my blog – I'll be sure to link up to your party next Monday. Have a Happy Thanksgiving.
I love your blog! Very talent young lady! I am your newest follower.
These are so cute! I love the shape, and I love the story behind the fabric!
These are absolutely adorable!!!! Thanks for coming to visit over at SugarTot Designs!
These are SUPER cute!! So whimsical and fun! I'm following you back now, thanks for checking out my blog and I linked up at your party, too!! Great blog!!
Thesen are totally amazing! I'm hopnoured that you'd want to follow my blog!!!! Will definately be checking out your monday link party!
Wow these are adorable…love that the fabric pieces are from Grandma. SWEET!
Those are precious!! And I love that they are so personal with the fabrics!
These stockings ROCK! I think they are the most fun stockings I have ever seen. And that they are the kids great great grandmother's dresses… Wow! I bet the next generation will be using them years from now.
Adorable! Ditto to all the other comments – Special because it came from Grandmas dresses!
Touched my heart!
This is the best idea. One I'm going to have to try
Thanks for stopping by 21 Rosemary Lane Jamie and your stocking project is adorable! I am now following you!!!
OH MY GOSH!!!! These are so AWESOME!! ADORABLE and so sentimental! I'm a big sap and LOVE anything sentimental! I wish I knew how to sew!! I would LOVE to make these!! You did such a great job! 🙂
Jamie,
thanks for visiting. I will certainly link up on Monday!
love, Olga
These are adorable!! I have been looking for an idea for new stockings this year. We just had twins so new ones are a must. Thanks for the idea and I will for sure start linking up on Monday's!!
Craftaffection.blogspot.com
Hello Jamie !!! These stockings are simply fantastic. Have never seen anyone make xmas stockings like these ! Love the vibrant colors and designs. As easy as you make it seem, I know, there's alot of hardwork and talent in the details.
Darling thank you so much for leaving me a comment and joining me at doodlebuddies.wordpress.com
I'm going to jump in the linking party right away !
Plenty of love
Naush
What lovely stockings! I love the swirly toes! And I think it's neat that they are made from family heirlooms.
Thanks for visiting my blog and for your sweet comments!
growcreative.blogspot.com/
Ohhhhh I LOVE these!
I have a Friend that would be over the moon for one for Christmas!
I may have to attempt one.
Thank you for stopping by my blog and following, I am so excited to follow yours!
Happy Thanksgiving
Michele
Cute cute cute!! I would love for you to come share this at our link party…junkintheirtrunk.blogspot.com/2011/11/link-it-up-wednesday-4.html
Very cute! What a great way to re-use such special fabric!
Hi, Jamie
I love this cute tutorial. Its just lovely and the colors are great. Happy Thanksgiving.
Vanessa
These are adorable and what a fantastic story behind them!!
Would love for you to link up to our "Home For The Holidays" link party! 😉
uncommondesignsonline.com/2011/11/yarn-trees-for-holidays-mini-tutorial.html
Couldn't agree more. They're the most beautiful stockings I've ever seen. A touch of love. Happy Thanksgiving.
Terrie from Hong Kong
They are absolutely adorable! Thanks for sharing the tute too!
Cool!!!!! I'll have to try it!
So lovely and what a great story! Very glad that you were able to join us at Pin'Inspiration Thursday.
Those stockings are fantastic! I love that there is so much history with them. I am pinning this for sure:)
Found you on HOH
OMG these are ADORABLE!! I love them!
I'm your newest follower!
Beautiful stocking!!
Thank you for this wonderful tutorial. The stockings are SO CUTE!
I'm your new follower. 🙂
Thank you very much for stopping by my blog and left a very kind comment.
These are stinking adorable! The little curl at the toe…super cute!
Happy Thanksgiving, inviting you to share your project with us at
passionatelyartistic.com/2011/11/happy-thanksgiving-2011.html
Have a fabulous shopping weekend.
Maggie
passionatelyartistic.com
Happy Thanksgiving, inviting you to share your project with us at
passionatelyartistic.com/2011/11/happy-thanksgiving-2011.html
Have a fabulous shopping weekend.
Maggie
passionatelyartistic.com
This is really cute – reminds me of Elf the movie … 'the best way to spread Christmas cheer' etc … have a little festive tutorial & giveaway going on too – really hope you will be able to join in.
These are beautiful and its so nice that you can bring your great grandmother into to holidays!
one tip that might make it easier to do the crazy-quilting, trace the pattern onto a piece of 'trash' fabric. Sew two pieces down face to face, finger press the seam open, repeat all the way down following the pattern. It adds more stability to more delicate fabrics too. After you finish adding the pieces cut out the whole shebang and use it as one piece of fabric. If thats way too confusing try googling "crazy quilt foundation piecing" Thanks for sharing!
chickenscratchny.blogspot.com/
so freaking cute!
These stockings are just gorgeous! Now I know what to do with all the scrap fabric cluttering up my cupboards..
A fabulous shape with the curl of the toe and the colours just top it all off. They are wonderfully unique! Lou
I absolutely love them!
Those are adorable, good job!!
I would love for you to link these up to my linky party going on right now! These are fantastic!
These are the cutest stockings I've ever seen! They turned out beautifully, and it's wonderful that they have such a special meaning to them.
I'd love for you to link these up to my Christmas themed link party! afishwholikesflowers.blogspot.com/2011/11/help-save-my-christmas-spirit.html
Hope to see you there!
This is a great tutorial! Great job – they are very cute and creative!
Thanks for linking up to Take it on Tuesday blog hop!!
Oh. My. Word! These are SOOOO cute! Please come share this at my Weekend Warrior Link party, I'd love to share this with my readers!!!
Anna
askannamoseley.com
Here's the link: askannamoseley.com/2011/11/weekend-warrior-link-party-31.html
Super cute elf stockings – what fun!! Thanks for linking up to TGIF. See you next week =-)
Beth
Oh my gosh. I want to make some too. Thanks so much for sharing on Motivated Monday at BeColorful.
Pam
These are fabulous! Something like this would work in my basement/family rec room!! Thanks for the inspiration!!
I found you from Sew Chatty's Monday link up party
~*Jessica
thevelveteenrabbitblog.blogspot.com
These Elf stockings are super cute! thanks for the tut!!!
Mariel
thetootsiewootsie.com
They are so adorable
Cheers
Sonia
cardsandschoolprojects.blogspot.com
I am Jewish and don't even celebrate Christmas but these are literally THE most fabulous stockings I've ever seen {both in design and history!} and I had to leave a comment and tell you they made me swoon!!! 🙂
yep, definitely the cutest stockings EVER!
These are so adorable and I love the story that goes with them!
Featured this on my blog today 🙂
craftingrebellion.com
they ARE the cutest ever!!
These are so AWESOME!! I completely love them!!!
Oh my goodness those are adorable. Thank you for sharing and for linking up to last weeks show and share party. Please come back this week and share your latest project with us.
A mommy's life…with a touch of yellow
wjwiki07[at]hotmail.com
These are really cute and I love that they have a fun story to them. It must be so fun to see them hanging up with all those great memories!
I love this great idea. I think I may make my own for my mantel. Consider, if you will, sharing it with my readers at sassafrassalvation.blogspot.com/2011/11/although-i-must-say-that-link-response.html. Thanks! Christmas blessings to you……….Kathy
How special to have the fabric and the memories! Well….I have elves…now I know they will all want stockings! Thanks for the tutorial! ♥
Oh my goodness these are adorable! I love that you used your gradmas dresses to make them. I featured them at So Very Creative! soverycreative.blogspot.com/2011/11/elf-stockings.html
Super cute!! And what a nice way to tribute all those dresses!
I just finished making my daughter one of these from this tutorial. I altered the top, by doing a sequin ribbon instead of the cuff, to sparkle it up more for her tastes. But it was so much fun making with her! She really enjoyed getting to pick out lots of fabrics she liked and then help me lay them out in the order she wanted. Thanks so much for this tutorial! It took some time since I had the strips curve like you did, but it was super fun to do! And easy!! I am a beginner with sewing, so if I can do this, anyone can. 🙂
The link is my daughters own little page. 🙂
Love the story, love the stocking! I wish I didn't make stocking last year!
Thanks for sharing at Calling All Crafters!
allthingsfee.blogspot.com
Your christmas stockings are so adorable!!!
Dee
Love it! Wonderful story, wonderful way to share great-grandma's legacy.
I have the same stocking my mother made for me as a baby and I have used it as a pattern for my husband and each of my kids.
I wanted to let you know I featured these cuties from last weeks Made U Look Thursday on Made in a Day. I have seen them everywhere linked up! (I think we party at a lot of the same linkys, lol) The story makes these so special. I have quilt made from my grandfathers pajamas, my moms fabric she used to make clothes from when she was little and other scraps from the 50's era, and I just love it!! It means so much to me! What a great heirloom to pass down. I would love it if you would come by tomorrow and grab your Feature button! And link something else up too! Congrats!
So cute 🙂
I just wanted to let you know I featured you today over at Blissful and Domestic:> Stop by and grab a button:>
blissfulanddomestic.blogspot.com/2011/11/pinning-it-wednesday-christmas.html
I agree… best stockings ever!!
I'd love for you to share this project on Inspiration Friday at Simply Christmas shabbyartboutique.blogspot.com/2011/12/inspiration-friday.html
Oh my gosh! SO ADORABLE. Thank you so much for linking up to Fresh Fridays on Release Me Create! Your project was one of the Freshest of the Week!
releasemecreations.com/2011/12/fresh-fridays-link-party-6.html
These are absolutely fabulous! I love that you used the dresses to make them I featured this in my Saturday Seven Spotlight this morning. Thanks for linking up to my Saturday Seven Party! positivelysplendid.com/2011/12/saturday-seven-spotlight.html
I think this is such a special way to remember your loved one. I would like to share your story with my DAR group. They are super cute too.
Just saw these on Pinterest (and repinned, of course) and HOLY COW – I'M IN LOVE. Maybe if I start on them now I'll have them done by December??? 🙂
These are adorable!
So cute! We are hosting the Whisk It Wednesday Link Party and thought you might want to share there too! Have a wonderful week! Carrie@ Carrie's Home Cooking
These are super cute. I love that you used fabric from your grandmother's dresses to make them. They are such wonderful keepsakes for your kids. Thanks for sharing your terrific project on Share Your Style.
Thank you.
Oh these are darling! I especially like the striped one. Thanks for sharing at The Creative Circle link party. Come visit again soon!
Thank you so much for sharing on the Whisk It Wednesday Link Party. Make sure you stop by tomorrow and join us again! Hope that you and your family have a wonderful Thanksgiving! Carrie @ Carrie's Home Cooking
Thank you Carrie! Always love your parties!
Very lovely stockings. I will definitely try this during the holidays.
Thank you for sharing it.
Lots of love from DIY Craftz – diycraftz.com