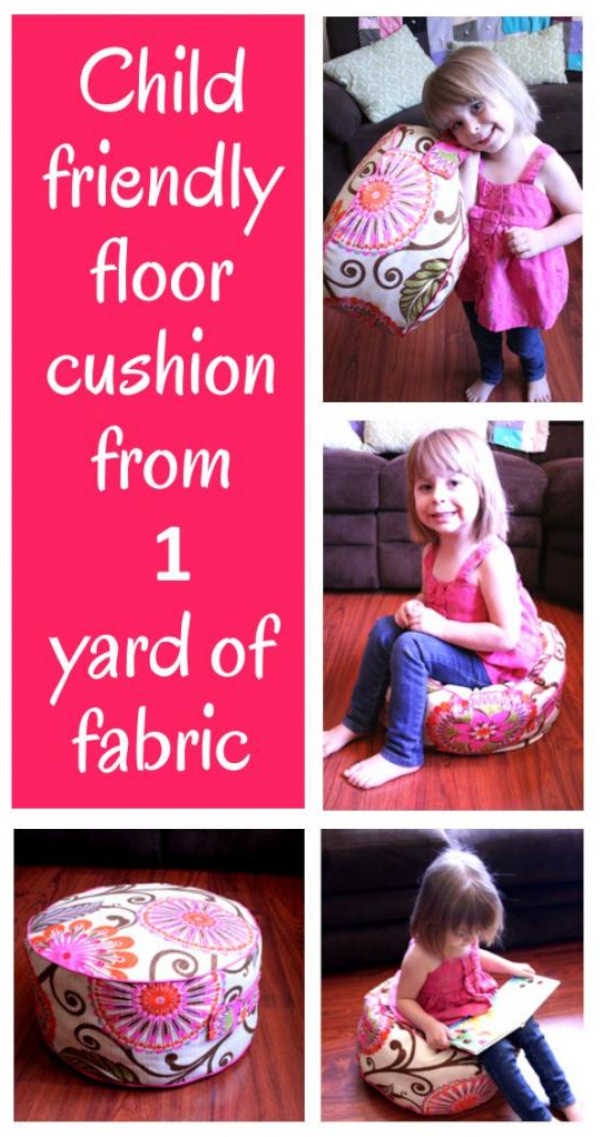

I am in love with this line of fabric from HGTV !!
I was lucky enough to be one of the first to review this fabric and I could not be more exited to share this fun tutorial with you. The best part is… It uses only one yard of fabric!!
Wait!! Do you want to see more amazing DIY projects?!! Subscribe to my mailing list to get updates sent straight to your inbox!
This post may contain affiliate links. Click here to read my full disclosure!
I received 1 yard each of Checkered Past upholstery fabric (a cotton/linen blend), a yard of Urban Blossom print fabric (100% cotton similar to canvas), and a yard of 1” Pleat Twill Cognac. (this product is no longer available but check out these similar items)

Right away I knew exactly what I wanted to make with this fun, brightly colored fabric.
I found this tutorial for a floor cushion at Living with Punks.
Material List: check out amazon link for recommended material
- 1 yard Home Dec Fabric
- 2 pkgs. 1/2 ” pre-made piping
- 24oz. Fiberfill
The best part about this tutorial is that it only requires one yard of fabric! One change that I made to the tutorial was using smaller handles. The handles in the original tutorial looked really large and since these where going to be use by kids I didn’t see the need for such large handles. I also didn’t have a compass to make the circles so I tied a length of string between two pencils. I held the point of the first pencil where I wanted the center of my circle to be, then holding the string tight I circled around it with the second pencil. (The length between the pencils was 8 1/2 inches, making my circles 17 inches.)
Cut List:
- Top and Bottom – 17″ circle (cut 2)
- Side – 9″x 54″ (cut 1*)
- Handle – 3″ x 9″ (cut 2)
Note* If your fabric is not 54″ you can piece together two pieces.

Once all your pieces are cut, pin your piping along the edge of your circles, making sure you pin it to the right side of the fabric. Pin the ends of your piping at an angle. The ends should look similar to the photo below.

After you sew your piping around your circles, sew a length onto the sides of one of your handle pieces.

Once the piping is sewn on you can pin you other handle piece on top (right sides together) then sew using your previous stitching as a guide.

Turn your handle right side out, tuck in the edges, iron, and sew onto your side piece. I wanted to make sure the handle would stay on so I double stitched a rectangle with an X in the middle as shown below.

Now its time to sew your side onto your end circles. Pin around the entire length of the circle and then pin the ends of your side piece together. Sew your side seam first and trim off any extra length. Then sew around the entire circle using your previous stitching as a guide. I double stitch mine for extra durability.

Pin on your top circle (right sides together). Sew around the length of the circle leaving a 6 inch gap. Turn inside out and fill with fiberfil.

Now you can hand stitch it closed and your done!

The girls love this floor cushion. The handle makes it so easy for them to drag it around.
As for the fabric itself, it is beyond amazing. The thick upholstery fabric is thicker than normal quilting fabric. I would definitely recommend it if you are making anything for kids since it can stand up to a lot more wear and tear than many other fabrics. I also LOVE the colors. They are so bright and vibrant.
If your wondering about the Checkered Past upholstery fabric, I started making a second floor cushion for my oldest but I decided to try out ric rac instead of piping and I didn’t like it at all.

So it will have to wait until I get some more piping.
I have yet to do anything with the trim. Any ideas?? I would love to know what you would do with a yard of 1” Pleat Twill Cognac?
Need to get organized? Be sure to check out my Etsy page for tons of organizing printables.

Related posts you may enjoy:
- Beautiful Transformations Using Paint
- Don’t forget the birds. 5 DIY bird feeders
- Organizing Your Fabric
- DIY Rag Rug
- Sewing 101 – Tips & Tricks For All Levels
- 15 Creative Uses For Flea Market Cups, Bowls, & Plates
- 9 Glow-In-The-Dark Projects Perfect For Summer Nights
- What Can You Make From One Yard Of Fabric? Try These 7 Tutorials.
- 14 Simple Hacks That Will Make Your Home Amazing
Connect with me & stay up to date with new posts on DIYHSH
Facebook | Twitter | Pinterest | Google+ | Instagram
Wait!! Do you want to see more amazing DIY projects?!! Subscribe to my mailing list to get updates sent straight to your inbox!
What a cute project!
Thank you Marilyn. It was so simple to make and the girls love it.
For a teenager would you make it bigger
Emily, for a teenager I would make the circles around 20"-25". Your side piece would also need to be longer. Here is a link to calculate the length of your side piece wikihow.com/Calculate-the-Circumference-of-a-Circle
Living with Punks has a great post were she made one for a teenager with fun piping that you should also check out. livingwithpunks.com/2011/10/tutorial-mondo-piping-teeny-bopper.html
I've pinned this as my daughter just asked me to make cushions for her kids to watch tv. Thanks! I'm thinking that trim would look pretty cute on a lampshade.
just found these and i am going to make up a few for my living room for the kids thanks for sharing.
The Joann fabrics are matchless…your project was cute and those cushions are best.
Thanks for the fantastic tutorial and tips to make home made floor cushions. Your floor cushions looks really comfortable. I will do this because the right floor seating can really be some of the best in the house.
Keep it up!!!
Thanks for the tutorial. I would love to make a couple of these for my two kids. The yard of 1" Pleat Twill Cognac would look great as an accent on some curtains, or even used to make a ruffly pillow or purse.
I will definitely be making some of these for Christmas gifts this year!!
Great tutorial and floor cuhsions are so popular at the moment, I guess largely because they can add so much flexibilty to a room.
I'd use the ruffle in between the main part and the cuff of a pillowcase. I've done it–looks sweet.
Cute! Going to have to make one for son so he stops taking the couch pillows and using them for seats!
I do not have children but would love one of these for myself. As for the Twill Trim I can see it on an Art Journal for yourself. Or as a ruffle around a neck of a cute little top for your cute little girl. On the base of a lampshade. The bottom of a skirt for yourself or your little one. The inside trim on a pair of curtains. Just to name a few of the ideas I had when I saw it :o)
I just finished making this for my 1-year old granddaughter. It was so easy and turned out so adorable! Thank you for you clear instructions that made it so easy and fun!