When we purchased our 1960 farm house there were a couple old windows left up in the attic. I had the idea to transform one of the windows into a message board. When I was asked to review a set of liquid chalk markers, it seamed like the perfect opportunity!

How to transform an old window into a message board:
1. Give the window a good washing to remove the majority of the dirt. (I used the jet setting on my garden hose and it worked perfect.)

2. Use a box knife to cut off any pieces of old caulking.

3. If there are any metal pieces holding the glass in place, use a pair of pliers to remove them. Once these are removed the glass should easily pop out of the frame. Once the glass is out fill a bucket with hot soapy water and using a scrub brush, scrub the entire frame to remove any remaining dirt.

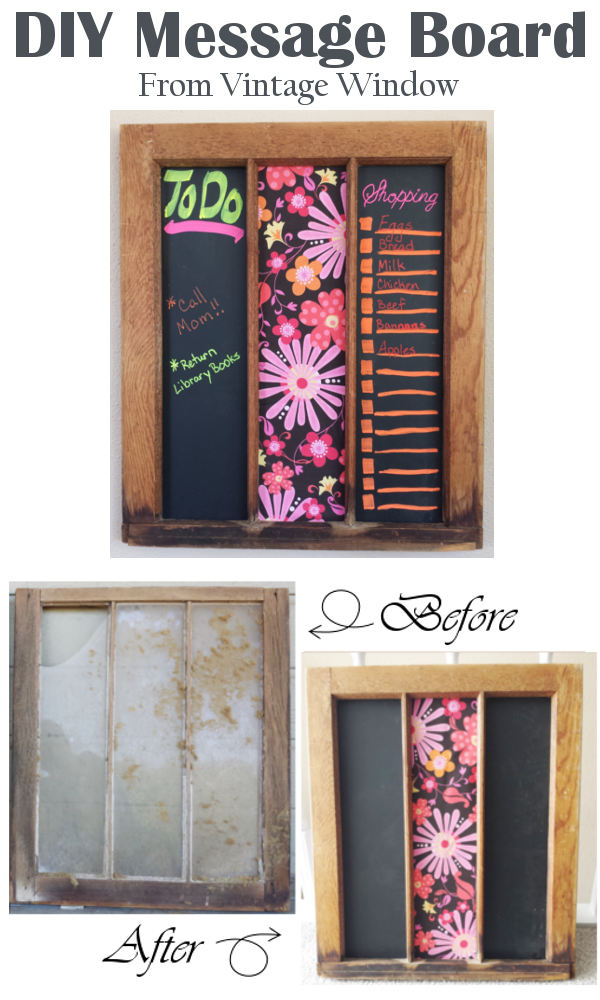
4. Use the pieces of glass as a template to cut out your chalkboard pieces. (You can find chalkboard at your local hardware store or make your own using any kind of thin board and painting it with chalk board paint.) A table saw would make cutting a lot simpler but if you don’t have one you can score the board with a box cutter and break the piece off.

5. For the center piece use a couple pieces of cardboard cut to size and cover them in fun fabric. The cardboard allows you to use pushpins to attach notes and keep them in a visible location.

I decided to use one side to keep track of to dos and the other side was perfect for a shopping list.

I absolutely love the vibrant neon colors of the ChalkOla Chalk Ink Markers

These neon markers contain liquid ink so when you first receive them you’ll notice the tips are white.

Using some scrap paper, press the tip down for a couple minutes. You’ll soon see the ink running down the tip of the marker. You’ll only have to do this to new markers. Once used the ink will flow smoothly.

I love the huge tips on the larger chalk markers. They make larger projects a lot easier.
I love that these markers don’t smear easily like regular chalk. This makes them perfect for using with projects that may be handled a lot or in a classroom or other area with kids who like to touch things. The package states that they are best used on non porous surfaces such as glass, whiteboard, mirrors, plastics, chalkboards, and ceramics.
I was amazed at how vibrant the colors looked against the dark chalkboard and couldn’t wait to test them on other surfaces. We have beautiful glass door that separates our living room from our dining room. I decided it would be fun to decorate it for the upcoming holiday!

Ok, so I may not be the best artist but my kids where pretty excited about the window so that’s!!
You can purchase your own chalk markers on the ChalkOla website or at amazon HERE (15mm Markers)
or HERE (6mm Pens) .
Get 20% off!!!
- Enter the code CHK20OFF to get 20% off the 15mm Markers.
- Enter the code CHALK20A to get 20% off the 6mm Pens.
Disclaimer: In exchange for this post I received a free set of chalk markers. All opinions are 100% mine.
Related posts you may enjoy:
- Beautiful Transformations Using Paint
- Don’t forget the birds. 5 DIY bird feeders
- Organizing Your Fabric
- DIY Rag Rug
- Sewing 101 – Tips & Tricks For All Levels
- 15 Creative Uses For Flea Market Cups, Bowls, & Plates
- 9 Glow-In-The-Dark Projects Perfect For Summer Nights
- What Can You Make From One Yard Of Fabric? Try These 7 Tutorials.
- 14 Simple Hacks That Will Make Your Home Amazing
Connect with me & stay up to date with new posts on DIYHSH
Facebook | Twitter | Pinterest | Google+ | Instagram
Wait!! Do you want to see more amazing DIY projects?!! Subscribe to my mailing list to get updates sent straight to your inbox!